Everything you can change is in Longshot’s in-game menu: graphics, sound, gameplay and controls. Pick a starting point
below, then look up any single setting in the list at the bottom.
Open the menu
Input
Open or close the menu
Move around it
Keyboard
F1, Insert or Esc
Q and E (or Tab and Shift+Tab) switch tabs, the arrow keys choose and change, Esc goes back
Controller
Home, or Select and Start together (or click the touchpad on a DualShock 4 or DualSense)
LB and RB switch tabs, the D-pad chooses and changes, A opens a page, B goes back
Mouse
Click a tab or a row, click the left or right half of a value to lower or raise it, right-click to go back
F1 always works to open the settings menu. Controls → Menu shortcut can take Esc or
Insert off the list.
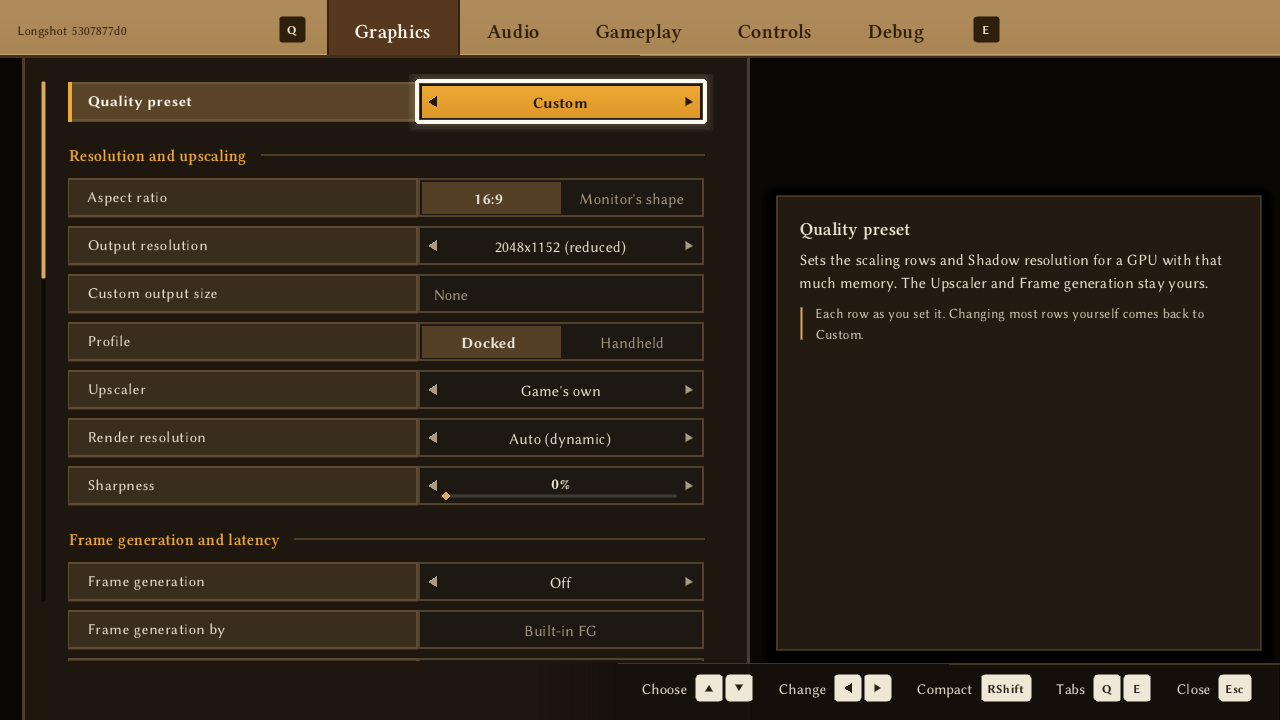
UI-only example from development build 5307877d on Linux. The Custom values shown are illustrative, not recommended defaults.
Your choices are saved as you go, in longshot_options.ini: with your saves when the launcher starts the game on Windows, the
same file for every version, else in the game folder (the README says where). A setting marked After a restart
applies the next time the game starts: when you close the menu it asks whether to restart. Later keeps the change
for next time; Restart now starts the game again, and you lose any progress since your last save.
Good starting points
A first start uses the Auto (this PC) quality preset. It picks settings from your graphics card and its video memory,
then adjusts the render resolution during the first minute of play. If you change nothing, that is what you get. The
Output resolution starts at the game’s own 2560x1440, or at your screen’s size where that is smaller (a Steam Deck’s
1280x800, a 1080p monitor), in your screen’s shape: a 2560x1080 ultrawide starts at 2560x1080 and a 2256x1504 laptop at
2256x1504, pixel for pixel. 2048x1152, marked “(reduced)”, is the game’s own smaller picture, lighter on the GPU.
Your PC
Quality preset
Upscaler and render resolution
Frame rate cap
Frame generation
Steam Deck, handheld, integrated GPU or a 4 to 6 GB card
Auto (this PC) picks Minimum (4GB); Low (6GB) on a 6 GB card
Game’s own, as the preset sets it, or AMD FSR 3.1 at Performance
60
Off
Most PCs (8 GB card)
Auto (this PC)
What Auto chooses: NVIDIA DLSS on an RTX card, AMD FSR 4 on an RX 9000 where the build has it, otherwise the game’s own
60
Off
A fast PC with a high-refresh monitor
High (12GB) or Ultra (16GB+)
DLSS or FSR 4 at Quality, or Native (DLAA or FSR 4 Native AA) for the sharpest picture
60
2x or Auto, up to your monitor’s refresh rate
Keep the frame rate cap at 60. Caps from 90 to 240 and Uncapped are experimental: some bosses and cutscenes
still count frames and can misbehave. For smoother motion, use frame generation instead.
Frame generation adds frames between the game’s own. Motion is smoother, but the game itself doesn’t run any
faster and input delay goes up a little. Auto matches your display’s refresh rate. On an NVIDIA RTX 40 card or
newer, with DLSS, DLAA or FSR as the upscaler, NVIDIA DLSS Frame Generation makes the frames; otherwise Longshot’s
built-in frame generation does. NVIDIA Reflex and AMD Anti-Lag 2 cut the added delay; they only appear on
cards that support them.
DLSS and DLAA look softer than the game’s own upscaler: set Sharpness to around 80% with them.
Ultrawide and 4:3: leave Aspect ratio on your monitor’s shape (the default). The 3D fills the screen while the
HUD and movies stay in the middle.
HDR: turn on HDR (Expanded or Native), then set HDR peak brightness to your monitor’s.
Every setting
The menu’s own descriptions, with the choices and defaults from the menu reference. Labels on
a setting say when it applies: After a restart, only on some GPUs or builds, only while HDR is on, or set for you by a
quality preset.
71 settings.
No settings match. Try another term or clear the filters.
The picture's shape: your monitor's own (the default: wider on an ultrawide, narrower on 4:3 or 16:10), the game's 16:9, or another your screen has. The Output resolution lists that shape's sizes.
Choices and requirements
The shapes your screen’s resolutions have, narrowest first (5:4, 4:3, 16:10, 16:9, 21:9, 32:9, …), your monitor’s own marked “(monitor’s)” (after a restart)
The game's whole frame, HUD included, before it is scaled to the window. Docked only.
Choices and requirements
The Aspect ratio’s sizes: your screen’s resolutions and the common ones (1440p, 4K, 5K at 16:9; 1920x1200, 2560x1600 at 16:10; 3440x1440 at 21:9; …), and 2048x1152 (the game’s own reduced size, 80% of its 2560x1440, marked “(reduced)”) at 16:9; your screen’s own size is marked “(native)” (after a restart)
Default 2560x1440, the game’s own picture, or your screen’s size where it is smaller (a Steam Deck’s 1280x800, a 1080p monitor), at its own shape (a 2560x1080 ultrawide starts at 2560x1080, a 2256x1504 laptop at 2256x1504); Auto (this PC) leaves it as it is
An Output resolution of your own, typed as width x height: your monitor's size, such as 3440x1440, 2560x1080 or 2560x1600. Each side is rounded down to a multiple of 8; a size the Output resolution offers is chosen there. Empty: none. Docked only.
Choices A size of your own, typed as <width>x<height> (after a restart)
Game’s own, NVIDIA DLSS (only in builds with NVIDIA’s DLSS SDK, below, on NVIDIA RTX GPUs), AMD FSR 3.1 (every build, on GPUs it runs on, below), AMD FSR 4 (only in builds with FSR 4, below, on GPUs AMD’s files cover), Off (no upscaling), Intel XeSS (Windows, with Intel’s libxess.dll beside the game, below). NVIDIA DLAA, AMD FSR 4 Native AA and Intel XeSS Native AA are DLSS’s, FSR 4’s and XeSS’s Native, chosen on the Render resolution row
Default Game’s own; Auto (this PC) chooses DLSS or FSR 4 where they run, never XeSS
Which of NVIDIA's DLSS networks draws the picture.
Choices and requirements
Transformer (K) (CNN (E) in its place on cards with less than 7 GB of video memory), Transformer 2 (M), Transformer 2 (L), NVIDIA default (shown where DLSS runs; used by DLSS and DLAA)
The share of the output the 3D is drawn at; the Upscaler fills in the rest.
Choices and requirements
Auto (the game’s own dynamic resolution), 100%, 75%, 67%, 50% (each with its size). With DLSS or FSR 4: Auto, Native (DLAA or FSR 4 Native AA: the 3D at full size), 92%, 83%, 75%, Quality (67%), Balanced (58%), Performance (50%), Ultra Performance (33%). With Intel XeSS the same stops, named by the XeSS mode each runs under: Native (XeSS Native AA), Ultra Quality Plus (92%, 83%), 75%, Ultra Quality (67%), Balanced (58%, 50%), Ultra Performance (33%). With FSR 3.1: Auto, 100% (its native AA), then the same as DLSS from 92%. With Off: Auto, 100%, 75%, 67%, 50%, 33%
Who makes the frames at 2x and up. NVIDIA DLSS Frame Generation needs a temporal Upscaler (DLSS, DLAA or FSR) for the scene's depth and motion. Changes at once.
Choices and requirements
DLSS FG (NVIDIA DLSS Frame Generation: RTX 40 and newer, with a temporal Upscaler), Built-in FG. DLSS FG is offered only where it runs; elsewhere the row has Built-in FG alone and its line says why (the log has NVIDIA’s answer). At DLSS FG, the game’s own menus, movies and loading screens show only the game’s own frames (they have no Upscaler picture to make frames from): the row’s line and the FPS counter say DLSS FG paused. With an Upscaler that is not temporal, the built-in one makes the frames and the line says why. RX_VK_DLSS_FG=1 fixes the row at DLSS FG for a run. Changes at once
Default DLSS FG where it runs, else Built-in FG (an options file’s Auto from before is this default)
Limits frames rendered by the game. Generated frames are additional. Changes at once. Past 60 is experimental: the game keeps real time, but some cutscenes and bosses can misbehave (Gohma, the intro's narration). 60 is the safe choice. Uncapped: as fast as the PC can, still at real time; with V-Sync on, the display's refresh rate is the limit. 30 FPS always uses real-time game speed, even when Game speed is Per frame.
Choices 30, 60 (the console’s), 90, 120, 144, 165, 240, Uncapped (changes at once)
Filters the finished picture, including the game's HUD, after window effects. Longshot's menu and overlays stay clean. Changes at once; quality presets leave it alone.
Virtual CRT raster, not Render resolution. Capped at half the destination height (at least one line); width follows its aspect. Non-integer scaling can cause moire.
Choices 240, 480, 720 virtual lines (changes at once; capped at half the destination height)
With the Aspect ratio at the monitor's shape: the pause, item and map menus, and what shows beside them. Loading screens and pre-rendered movies, which draw no world either, get the same sides. Changes at once.
Choices Full width; Centred, blurred sides; Centred, black bars (with the Aspect ratio at the monitor’s shape)
HDR10 out on an HDR display (Windows: Use HDR on in the display settings). Expanded: the game's SDR picture, its white at the paper white and its highlights up to the peak. Native: the game's own HDR, told the display's peak and paper white.
The HDR picture's contrast around mid grey, as the RenoDX HDR mods grade it: above 100% deeper shadows and brighter highlights, which ease into the peak brightness; below it flatter. With Native the game's own HDR picture is graded too, under the peak brightness the game is told.
Choices 50% to 200% around mid grey, in steps of 5 (while HDR is on)
With Native, how the game's scene meets the peak brightness. Vanilla: the game's own curve. PsychoV35: RenoDX's tone mapper, the same mid grey with highlights that roll off into the peak and keep their colour.
Choices and requirements
Vanilla (the game’s curve), PsychoV35 (RenoDX’s; with HDR set to Native). Compatible DLSS/DLAA, FSR 4/native AA and shared-chain FSR 3.1 upscaling run automatically; RX_VK_PSYCHOV35_DLSS=0 disables that compatibility route. Off and the spatial/FXAA TAAU replacement support PsychoV35 directly. FSR 3.1 FG remains separately opt-in and 2x only; legacy own-input FSR upscaling remains unsupported
Keeps textures sharp on surfaces seen at a slant, such as the ground ahead: higher is sharper in the distance, for a little GPU time. Game's is the console's own (1x or 2x).
The size of the sun's shadow maps: higher keeps the shadows of thin things near you, such as chains, fences and leaves, smooth instead of stair-stepped, for more video memory and a little GPU time. Applies at once.
Choices Auto (for the card’s memory), Game’s (1600), High (2200), Highest (3072): the sun’s shadow maps, applies at once
Adjust capture for Longshot only; system volume is unchanged. Use the microphone test to see live levels while adjusting gain. Changes apply to new samples.
Choices Software input level, 0–400%; applies to new samples without changing system volume
Start or stop microphone capture. No playback or audio files. You can adjust Microphone gain while testing. Leaving Audio, closing the menu or selecting Off stops the test; the game can still use the mic.
Choices Start/stop capture; live levels appear in the help box for Test microphone and Microphone gain
How large the FPS counter is drawn. Auto grows with the window, as the menu does; Small, Medium and Large keep one size whatever the window, the size Auto has in a 720p, 1080p and 1440p window.
Which lines the FPS counter's Dev level shows, and whether the version and hardware show at every level.
Choices and requirements
Opens the FPS counter details page: Version and hardware at every level (Off, On; Off), then a line each of the Dev level (VRAM, Textures, Draws, Dispatches, Render passes, Draws skipped, Texture uploads, Pipelines built, GPU slot waits, Queue submits, Write-backs) and the CPU and GPU lines (Off, On; On)
How much of the world you see: 100% is the original view. Higher is wider, lower is closer. Changes apply at once during gameplay. Cutscenes keep their own view.
Choices 50% to 150%, in steps of 5; applies immediately during gameplay
Auto (the game’s language), or English, Português (Brasil), Español (Latinoamérica), Español (España), Français, Deutsch, Italiano, Nederlands, Polski, Русский, 日本語, 한국어, 简体中文, 繁體中文
Skips the new-game opening (the story movie and the opening wake-up scene) and leaves later cutscenes, the first dungeon meeting, and the title screen alone.
Choices Off, On (skips the new-game opening: the story movie and the opening wake-up scene; later cutscenes and the title screen stay)
Saves what an issue needs in a new folder, bug-reports in the game folder: report.txt with the issue form's answers (this version, where you are, your graphics card and driver, CPU, RAM and system, the options and switches you changed), the logs of this run and the last one, and a picture of the game. Your user name and home folder are taken out of them. No saves or game files go in, and nothing is sent.
Choices Saves a report into a new folder in bug-reports (below)
Stops the camera gradually turning toward the direction you move, useful with native mouse look. Off keeps the game's standard behavior. Manual camera controls and recentering still work.
How far the camera turns for a mouse movement, with either Mouse camera: at 1.00 native look turns 0.1 degree a count. The - and = keys change it in game too.
How fast the right stick turns the camera, in percent of the game's own speed; the camera keys too, and the mouse with Mouse camera As the stick. The game's own camera speed setting still applies.
How far a stick moves from center in any direction before the game sees it. Lower for a precise stick, higher for one that drifts. The game's own dead zone still follows.
The button icons the game shows, in its texts and menus: those of this controller, for the buttons your controls put each action on.
Choices and requirements
Auto, Original console, Xbox, PlayStation 4, PlayStation 5, Steam Deck, Keyboard (on the Controls page; changes at once where the game allows it, else after a restart)
Motion controls: aiming with the controller's gyroscope, its sensitivity and its inverts.
Choices and requirements
Opens the Motion page: Motion controls (Off, On; On), Motion sensitivity X (10% to 600%) and Y (10% to 300%, in steps of 10; 100%), Invert motion X and Y (Off, On; Off), Motion deadzone (Low, Standard, High; Standard)
How the Walk key makes Link walk with the movement keys: while it is held, or from one press to the next. It is Caps Lock unless the Controls page changes it.
Which keys open and close this menu. F1 always does; F1 only leaves Insert free for an overlay. With Esc, Esc opens it too, as a PC game's pause menu (open, Esc still goes back a page or closes it).
Which key switches between the full menu and the compact bar (or opens directly to the compact bar when held with the menu shortcut).
Choices Right Shift, Right Ctrl
Default Right Shift
Change one thing at a time
When something looks or runs wrong, change a single setting and compare the same place in the game. To report a
performance problem, follow the performance steps; for bindings and controller
layouts, see the controls reference.